4. TML Solution Studio (TSS) Container
Before you can build TML solutions, you will need to run the TSS container for your OS. The TSS builds your TML solutions.
TSS Containers |
Tip
Watch the TSS YouTube Video
Important
You MUST have the pre-requisites met before running this container: TSS Pre-Requisites
This is the main container that you need to use to build TML solutions. Below is the TSS Docker Run Command to run the container.
Important
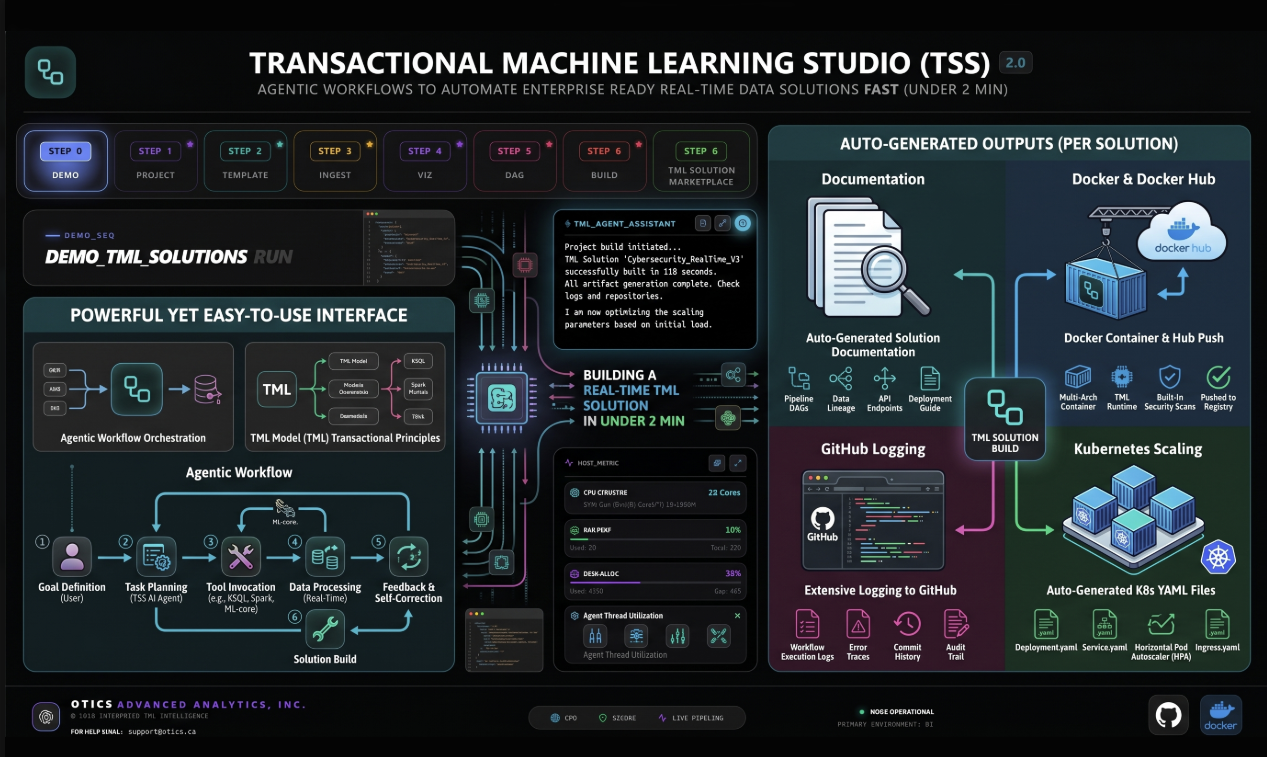
Use this TSS container and start building amazing, advanced and scalable real-time data streaming solutions - with real-time dashboards - auto deployment to Docker - auto solution documentation - integrated with AI - integrated with Github - integrated with Apache Airflow - integrated with Apache Kafka - in just a few minutes.
4.1. TML Solution Container Global Deployment
There are TWO ways to deploy TML solution containers:
Docker Container: Anyone around the world can run the container using the Solution’s Docker Run Command
Kubernetes: Anyone around the world can run the TML Solution containers in kubernetes
For 1: see figure below

TML solution developer creates the TML solution container, any user around the world can run this solution with their own: 1. Github username/repo 2. Readthedocs token 3. Docker username
This means that ONE TML solution container is used by others with their OWN data, configurations parameters, and credentials without creating thousands of containers … think of this as FORKING in Github.
4.2. TSS Pre-Requisites
Attention
The following prerequisites MUST be met before you run the TML Solution Studio Container using the TSS Docker Run Command :
You MUST Install Docker - in Linux Ubuntu run (if using Windows use WSL):
sudo apt update
sudo apt upgrade
sudo apt install docker.io
sudo docker --version
sudo docker run hello-world
sudo docker ps
You MUST have a Github Account
You MUST Clone Github Repo: https://github.com/smaurice101/raspberrypi.git
You MUST Create Github Personal Access Token. Refer to Set Up Personal Access Tokens in Github
You MUST have sign up for a Docker Hub account:
Create a Readthedocs account and get an API token: Set Up Readthedocs
Create a HiveMQ account - while this is OPTIONAL - if using MQTT and HiveMQ you will need this.
Kafka Cloud API keys from Confluent or AWS MSK - while this is OPTONAL - it will be for production, or large scale, deployments.
FOLLOW THE How To Use the TML Solution Container SECTION.
Tip
DEMO CREDENTIALS are available for quick access: TSS Demo Github, Docker and Readthedocs Site Credentials
Note: the demo credentials are public so others may be using it. Once you are happy with TSS you will need to enter yur own private credentials.
4.3. TSS Contains a TML Dev Environment
Important
Another powerful feature is the TSS TML Development environment which is contained directly inside the TSS container. TSS comes with all the TML solution components installed like: 1. Apache Kafka, 2. TML binaries, 3. MariaDB config db 4. your TML DAG scripts, 5. Viperviz for visualization
Once you are satisfied with your solution - you can use the STEP 8: Deploy TML Solution to Docker : tml-system-step-8-deploy-solution-to-docker-dag to deploy your solution to Docker.
Tip
TML developers can test each component or their entire TML solution inside the TSS before deploying the solution in the container. This is a very convenient way to make sure all the solution components are working before shipping your TML product.
4.4. TSS Docker Run Command
Note
If you are producing data using a local file, you need to add an extra -v volume map to the /rawdata folder in the container: Refer to Producing Data Using a Local File.
For example add -v /your_localmachine/foldername:/rawdata:z, where your_localmachine/foldername is a path in your local machine, and it is where you save your local file for processing.
Your file must contains JSON messages on each line. See Sample File
docker run -d --net="host" \
--env CHIP="AMD64" \
--env MAINHOST=127.0.0.1 \
--env TSS=1 \
--env SOLUTIONNAME=TSS \
--env NPMSERVERPORT=3000 \
--env AIRFLOWPORT=9000 \
--env VIPERVIZPORT=9005 \
--env EXTERNALPORT=-1 \
-v /var/run/docker.sock:/var/run/docker.sock:z \
-v /<your local dagsbackup folder>:/dagslocalbackup:z \
-v /your_localmachine/foldername:/rawdata:z \
--env READTHEDOCS='<Token>' \
--env GITREPOURL=<your github repo URL> \
--env  GITUSERNAME='<your github username>' \
--env GITPASSWORD='<Personal Access Token>' \
--env DOCKERUSERNAME='<your docker hub account>' \
--env DOCKERPASSWORD='<password>' \
--env MQTTUSERNAME='<enter MQTT username>' \
--env MQTTPASSWORD='<enter MQTT password>' \
--env KAFKABROKERHOST=127.0.0.1:9092 \
--env KAFKACLOUDUSERNAME='' \
--env KAFKACLOUDPASSWORD='<Enter your API secret>' \
--env SMTP_SERVER=''
--env SMTP_PORT=
--env SMTP_USERNAME=''
--env SMTP_PASSWORD=
--env recipient=''
--env UPDATE=1 \
maadsdocker/tml-solution-studio-with-airflow-amd64
Parameter |
Description |
CHIP |
Specifies the container OS. NOTE: If you are using MAC then change to CHIP=ARM64 |
NPMSERVERPORT |
This is the port number for TSS. For example, NPMSERVERPORT=3000, will cause TSS to listen on port 3000 i.e. http://localhost:3000 Users can change this port. |
MAINHOST=127.0.0.1 |
This is the IP address for the TML solution container. It will normally listen on 127.0.0.1 |
TSS |
Do not modify. |
SOLUTIONNAME |
Do not modify. |
AIRFLOWPORT=9000 |
This is the AIRFLOWPORT. This port will be needed to access the TML solution studio from your browser. For sample, enter: http://localhost:3000/ You will be asked for a username and password: enter tml for both. |
VIPERVIZPORT |
Choose a Viperviz port for visualization. For example, 9005 |
-v /<your local dagsbackup folder>:/dagslocalbackup:z |
If you like, you can also backsup the dags to your local folder with this volume mapping |
-v /your_localmachine/foldername:/rawdata:z |
If you like, you can also map our local folder to the rawdata folder. This is neede if you will be processing local files with TML. |
-v /var/run/docker.sock:/var/run/docker.sock:z |
This maps the docker volume to the container - so TML studio can automatically build your solution container. |
READTHEDOCS=<Token> |
Create, copy and paste the Readthedocs token here. Refer to Set Up Readthedocs |
GITREPOURL=<your github repo> |
This is your Git repo you cloned from: |
GITUSERNAME=<your github username> |
This is the username to your repo. |
GITPASSWORD=<Personal Access Token> |
This is the Personal Access Token for your repo. Look at the image below to find out how to generate this token. |
DOCKERUSERNAME=<your docker hub account> |
This is your Docker Hub username. |
DOCKERPASSWORD=<password> |
This is your password to Dockerhub account. |
MQTTUSERNAME=<your MQTT username> |
This is your MQTT username. |
MQTTPASSWORD=<MQTT password> |
This is your password to MQTT cluster. |
UPDATE=1 |
This enables system updates if set to 1: meaning any updates to the system DAGS made by the TSS system maintainer will update all the user DAGS in all of the projects. This is a remote GitHub pull that keeps users ALWAYS with the updated Dags. You can Turn OFF system updates by setting to 0. |
maadsdocker/tml-solution-studio-with-airflow-amd64 |
This is the official TML Solution Studio container for Window/Linux users with AMD64 chip architecture. If using MAC/Linux change: amd64 to arm64 For example:
|
4.5. Backing Up TML Solutions Locally
All TML solutions are not only auto-committed to GitHub but also saved locally to disk.
Important
It is highly recommended you map your local folder
to the dagslocalbackup folder:
-v /<your local dagsbackup folder>:/dagslocalbackup:z
This ensures that if anything happens to Github you
always have a local copy of all of your solution dags.
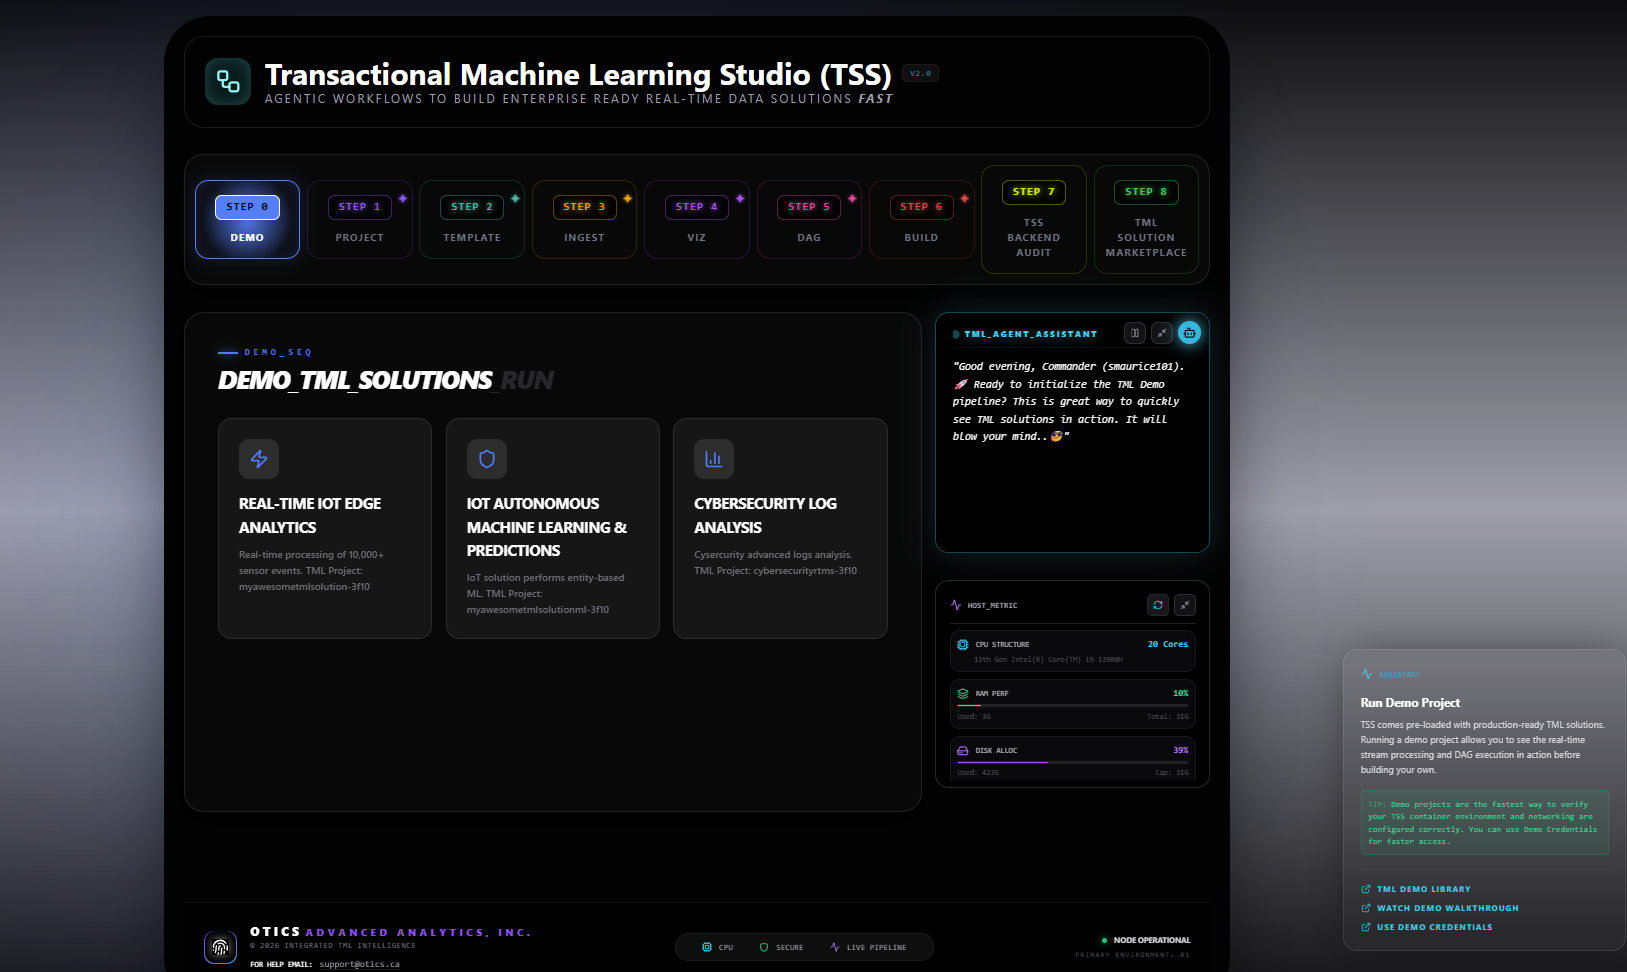
4.6. How To Use the TML Solution Container
Tip
Once you have the TML Solution container running you can go to your favourite browser and type the URL: http://localhost:3000
After you enter the URL you will the following website:

Tip
The username and password are both tml
After you have signed in successfully you will see the following screen with example DAGs:

If you scroll down you will see the TML DAGs - as defined here: DAG Table. These are the DAGs you will use to build your TML Solutions:

4.7. TSS Code Editor
Important
Next go into the DAG Code Editor: Select Drop-down menu Admin –> DAGs Code Editor. Most of your TML Solution building will be done here. Note the DAGs solution process flows defined here: Apache Airflow DAGs

4.8. TSS Demo Github, Docker and Readthedocs Site Credentials
Important
To make it easier for users to run a TML solution quickly, a TML Demo Github site is provided here:
GITHUB USERNAME: tsstmldemo
GITHUB REPO URL: https://github.com/tsstmldemo/tsstmldemo
GITHUB Personal Access Token: <This will be retrieved for you from the OS IF using tsstmldemo repo>
Readthedocs Token: aefa71df39ad764ac2785b3167b77e8c1d7c553a
Docker Username: tsstmldocker
Docker Password: TssTml0828!?
Note: The above credentials are for demo purposes ONLY and are shared with anyone. They ARE NOT meant to be used permanently. If you like TSS/TML and plan to use it seriously, then personal accounts and credentials must be used. Refer to TSS Pre-requisites on how to set these up.
4.9. Readthedocs Documentation URL
Important
The TSS is integrated with Readthedocs for automated documention via Github.
All TML auto-generated documentaton can be found on readthedocs. The format of the URL is: https://<solution name>.readthedocs.io.
For example, if you created a project name cybersecurityrtms-3f10, then the url will be:
https://cybersecurityrtms-3f10.readthedocs.io
The solution name can be found in the Step 1 task under your project name. As shown in the figure below, the TML solution name is cybersecurityrtms-3f10
Tip
You also add -a stdout to your solution Docker Run command. This will allow you to see the READTHEDOCS URL to your documentation.

4.10. Common Docker and TMUX Commands
This is a list of common commands for Docker and Tmux.
Description |
Command |
List Docker containers |
Type: docker image ls |
Delete Docker containers |
From: docker image ls and copy the REPOSITORY to delete Type: docker rmi <REPOSITORY name> --force |
List Running Docker containers |
Type: docker ps |
Stop Running Docker containers |
From docker ps copy the Container ID Type: docker stop <paste container ID> |
Stop ALL Running Docker containers |
Type: docker stop $(docker ps -a -q) |
Go inside the Docker containers |
From docker ps copy the Container ID Type: docker exec -it <paste container ID> bash |
List the TMUX windows once inside the container |
Type: tmux ls |
Go inside TMUX windows |
From tmux ls copy the window name you want to enter Type: tmux a -t <window name> |
To scroll inside a TMUX window |
Press: CTRL+b, [ |
To UN-scroll inside a TMUX window |
Press: CTRL + [ |
To EXIT a TMUX window |
Press: CTRL + b, d |
To EXIT docker container |
Type: exit |
To Prune Docker System and Recover memory |
System Prune type: docker system prune |
To remove ALL containers |
Type: docker rm $(docker ps -a -q) |
4.11. TSS Logging
The entire TSS solution build process is logged and committed to Github. This makes it very convenient to check for any errors in the TSS build process, and because errors are commited to the remote branch, the errors become visible to others to help in quickly rectifying any issues.

Tip
The logs are committed to your Github folder: /tml-airflow/logs/logs.txt
